How to build a blog with GitHub Pages and Jekyll!

I recently decided to change my blogging platform. I simply want to focus on writing new content, and not deal with the peculiarities of different CMS tools. Ideally, I wanted the whole content to be stored in a git repository, and to be able to post articles in a form of markdown files. The design might not be anything fancy, but should be clean and easy to navigate for the users.
First of all, I defined my requirements and listed the features I want the site to have.
- Use git repository as storage, and publish it publicly on GitHub.
- Write articles in form of .md files, and publish them by simply pushing to the repository.
- I should be able to divide the articles into categories and should be able to assign tags.
- It should support pagination.
- It should support searching through articles (title and description)
- It should support comments (disquss maybe?)
- It should list related articles, recent articles, etc.
- Users should be able to browse through categories or tags
- Users should be able to browse the archive.
There are plenty of options that would fit these requirements. But, ultimately I decided to host my blog as a static site on GitHub Pages. It has built-in support for Jekyll (as a static site generator), it’s integrated with GitHub repositories (obviously) and on top of that I can use GitHub actions if there is a need for complex builds/deployments.
In the following sections, I’ll walk you through the whole process and provide more details for each step.
Preparing the custom domain
If you want to use your custom domain name for GH Pages, then you need to update your DNS records, so they correctly point to GH hosting servers. I had my domains on GoDaddy, but since Cloudflare offers free SSL certificates (even on the free tier), I moved the DNS management to Cloudflare. If you don’t have SSL for your domain, then I strongly urge to get one.
Create an account and create your domains on Cloudlfare. Once you do that they will provide their nameservers, which you will have to provide to your registrar. Simply login to your domain registrar’s site and change the nameservers into the ones provided by Cloudflare. The change propagation might take some time (up to 48 hours in some cases).
Once the change is validated by Cloudflare, then update your DNS records as shown below
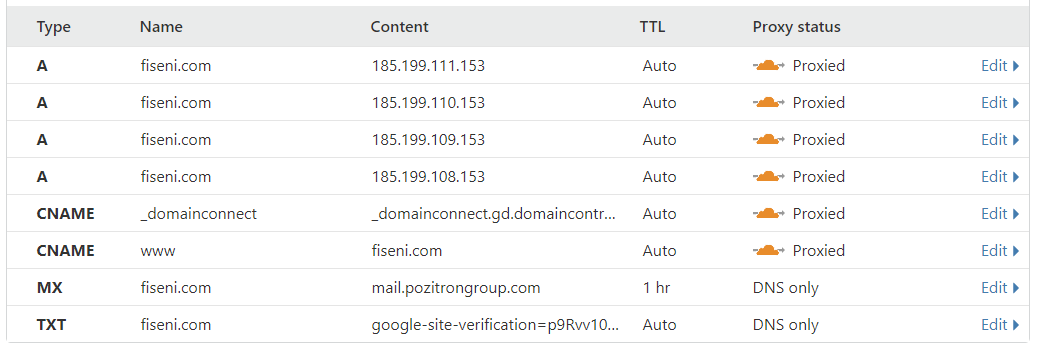
The A records should point to the GH servers, and you can copy these lines as they are. You should also add a CNAME for www subdomain. You can ignore the MX record, it has to do with mail configuration (I’m pointing to my mail server). Lastly, if you add your site to Google Search, you will need a TXT record for site verification.
This is all you need in order to use your custom domain.
Choosing a template
There are a lot of jekyll templates that you can choose from. Here is a list of some theme galleries
I want a simple and clean template. No longer I want any additional side content (e.g twitter feeds). You can find the template I chose in the following link. The author, Cotes Chung, did an awesome job. Also, I rarely see such an organized and comprehensive GH repository. Documentation, examples, contribution guidelines, templates for issues. Kudos to the author!
I did additional changes to the template, and you can find my repo here. If you like it, please feel free to use it as you wish. Still, I urge you to give some credit to the original author (starring the project at least).
Installation
I will try to simplify the installation steps here. If you need more information, check here. If you need to build the site locally, then you will need a linux environment. Now that we have WSL2 on Windows that’s quite easy to accomplish, and it’s not worth trying to make it work natively on Windows.
- Fork from Cotes Chung’s repository or Fati Iseni’s Blog (based on your preference). You can copy the content instead of forking if that’s more convenient for you.
- Change the name of the repository into
{username}.github.io, whereusernameis your github username. You get one site per GitHub account and organization, and unlimited project sites. Clone the repository locally
1
 git clone https://github.com/USERNAME/USERNAME.github.io.git
(Now you will need to prepare the local environment)
Install
Ruby,RubyGems, andJekyl. Additional information here1
sudo apt-get install ruby-full build-essential zlib1g-dev
1
2
3
4
 echo '# Install Ruby Gems to ~/gems' >> ~/.bashrc
 echo 'export GEM_HOME="$HOME/gems"' >> ~/.bashrc
 echo 'export PATH="$HOME/gems/bin:$PATH"' >> ~/.bashrc
 source ~/.bashrc
1
 gem install jekyll bundler
Go to the root directory of the project and complete the installation of the Jekyll plugins
1
 bundle install
Install a few more tools that we will need.
1
 sudo apt-get install coreutils
1
2
3
4
 sudo apt-key adv --keyserver keyserver.ubuntu.com --recv-keys CC86BB64
 sudo add-apt-repository ppa:rmescandon/yq
 sudo apt update
 sudo apt install yq -y
Now that the required tools are installed, go to the root directory of the project and run the init job. You need to do this only once, it cleans the repository and makes it ready for you.
1
 bash tools/init.sh
Update the configuration and customize it for your needs
- Update the
_config.ymlfile with your information - Update the
CNAMEfile, enter your domain name - Update the images under
/assets/img/
- Update the
Run the site locally
1
 bash tools/run.sh
Deploying on GitHub Pages
Usually, pushing the content is all you need. GitHub Pages will build it automatically and your site will be up and running. In our case, we’re using build scripts in order to generate some additional content (list of tags, categories, archives, etc). GitHub Pages does not allow script execution (for safety reasons), so we will use GitHub Actions to build the site manually using our own build script.
Everything is already configured (there is yaml file under .github folder), you just have to follow these steps
- Push the content to master branch. Once the build is complete, new branch will be generated
gh-pages - Open the repository setting under GitHub, and change the publish source to
gh-pages
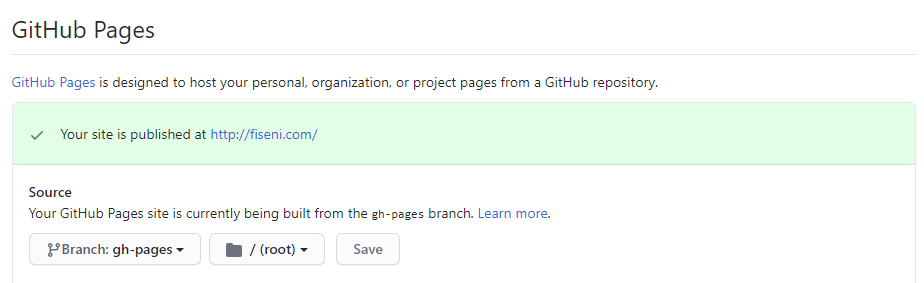
Now, your site will be up and running.
Publishing content
In order to publish new articles, all you have to do is create a new .md file under posts folder. Each file should contain the following information at the top
1
2
3
4
5
6
7
8
9
10
11
---
title: "Welcome to my new blog!"
date: 2020-10-30 12:00:00 +0100
description: My new blog based on GitHub Pages and Jekyll.
categories: [Blogging, Tutorial]
tags: [Productivity]
image: /assets/img/pozitron-cover.png
pin: true
# math: true
# toc: true
---
If you want to learn more about all the available variables that you can use, then click here.
Comments powered by Disqus.